Vellum Grains: Legacy
We hope that what we do may have an impact, both in the present and perhaps for longer. Vellum grains were the topic of the day and I wanted to explore a classic hourglass but with a twist. Like most projects I undertake there is an intersection of learning as well as what is on my mind at the time. Having time to reflect and the ability to express thoughts in my art are important. Summer is an excellent time to learn, but also to remember those who have influenced me over the years. The limit of time and the inevitability of that time coming to an end are intricately weaved into our thoughts, memories and dreams. Time is precious.
Below are some of the technical problem solving that occurred during this project.
Model of me by Texel Scan at SIGGRAPH Asia 2016.
Also on youtube at https://www.youtube.com/watch?v=CsKSPZ7lUWM
The three major lessons for this project were:
- glass in mantra (finally had to use thin film reflection which I had run across in my platonic solid study but had not used). Although mantra may only be around a little bit longer, the lesson of having differing shader models to calculate a result was a good reminder - GGX vs Phong for example. Phong produces less "noise", however the computation can result in a very different looking glass surface. If you want to experiment you can dive inside the shader by RMB (right mouse button) and selecting "allow editing of contents". Search for "core" and then inside that node search for "translucency" and you will find the dropdown for the algorithm used. This also came up in Pentagon Reflections as a way of reducing noise (but altered the image). (PICTURE) The default glass on the shape was unrealistically distorted so I resorted to the thin film refraction approach. It then looked very flat but lighting to the rescue. Some carefully chosen rim lights brought it back to a more realistic shape.
- vellum grain - my first time simming vellum grains - like all
sims - it is a balance.
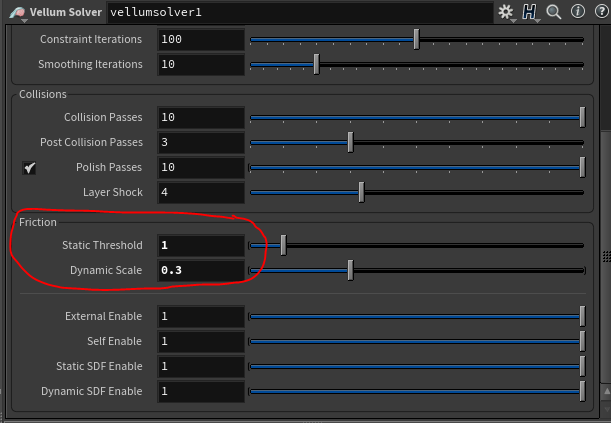
- getting it to pile up - thanks to a tip from Matt Estella -
adjusting the friction
- One that sent me on a google search. My model in render appeared cracked after the boolean. Geometry was okay (despite the boolean warnings about cross-boundaries). However the uv's were being corrupted after boolean (seem below with the gold striping patterns on the jacket). After trying attribute transfer and various other methods, I almost switched to a clip node but one last forum search revealed a very simple problem and easy solution - the model had point uvs rather than vertex uvs - attribute promote to the rescue! Phew.
- Thanks to the forum post https://www.sidefx.com/forum/topic/53578/?page=1#post-240764

Vellum grains are cool in that they allow particles to pile up.
However they do seem to be a bit harder to control than pops
themselves (my opinion). Houdini offers vellum grains (piled
points),
pop
grains
(before we only had the interact node but pop grains
work on a position-based solver unlike the interact node that
pushes them apart) which use a position-based dynamics approach.
In looking into this topic there is also a stand-alone grains
package called Storm offered by
EffectiveTDs.com (I had heard of Thinking Particles but this
one was new to me - no opinion as I have not tried it personally).
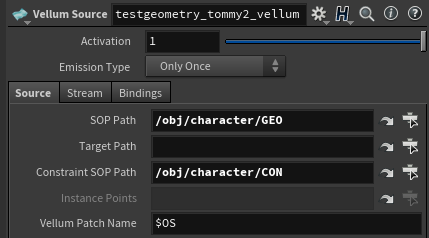
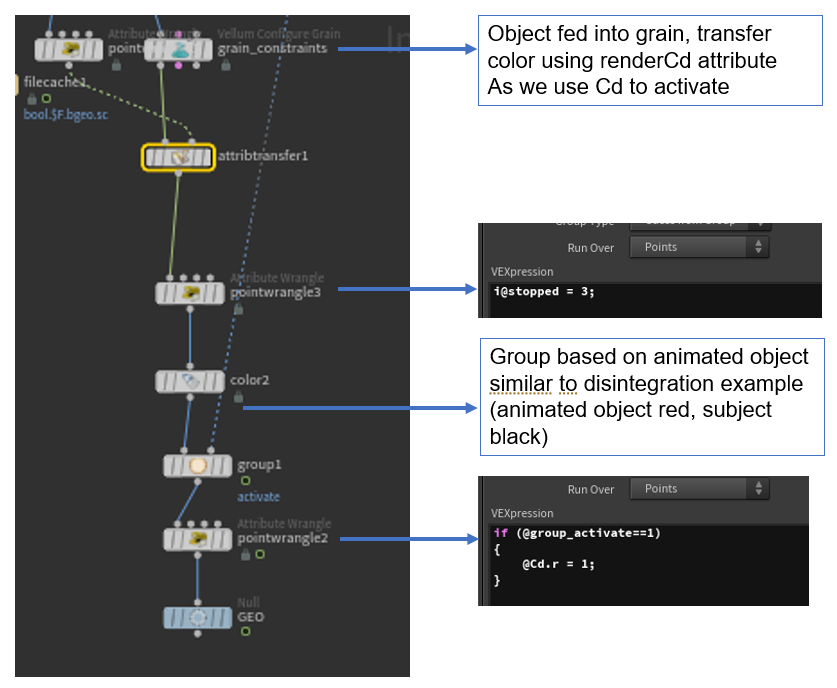
For the visuals, Legacy was created using the standard attribute transfer of color to create points (see particle disintegration) fed into a vellum grain and emission type always. (COMING SOON) For the visual Turn back Time I used an approach similar to the one found here, however it needed to be modified as my particles were headed downward, and the particles would stop once started if they were in the bounding box range. Great for creating a particle skirt but not what I wanted. The trick of using the geometry wrangle in the dop with a sop solver instead of in sops to turn particles to be active was key. Thanks to Resilient Pictures Company for that tip instead of using emission always. As noted the emission type "always" behavior can be a bit crazy, but I used that to my advantage in the first visual as there are no rules for how a character inside of an hourglass will behave.
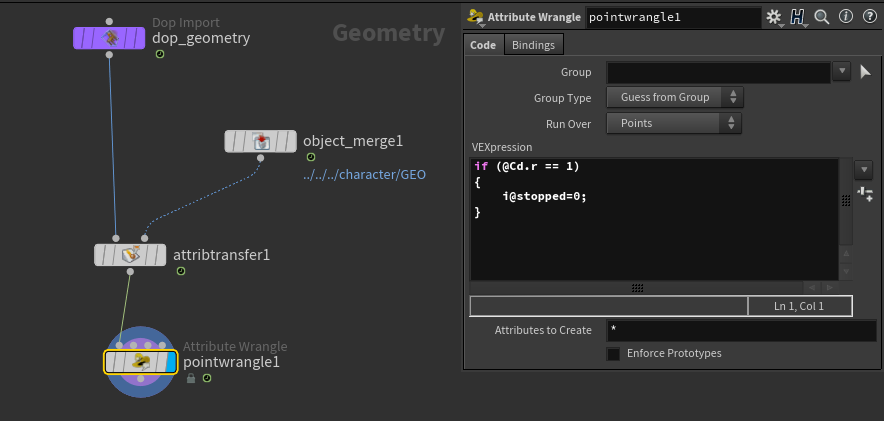
I set all points to stopped (which if you look at the documentation they use 0, 1, 2, 3). Fully stopped is 3. This is nearly identical to the method using attribute transfer, except now a group is used so that we can set the activation in dops.
Like with my bullet example of geometry wrangles, you will need to use a multisolver in dops or the information will be ignored

I am continuing to explore vellum and will post any new insights here.